Choosing the Right Pot and Soil
How to plant basil in pots – So, you’ve decided to embark on the noble quest of growing basil. Excellent choice! But before you even THINK about planting that tiny sprout, let’s talk about the essentials: pots and soil. Think of it like choosing the perfect house and neighborhood for your little basil buddies. Get it wrong, and you’ll have a grumpy, wilting herb on your hands.
Get it right, and you’ll be swimming in pesto!
Choosing the right pot and soil is crucial for healthy basil growth. The pot size needs to accommodate the basil’s root system, while the soil should provide optimal drainage and nutrients. Let’s dive into the specifics.
Pot Selection
The pot you choose will significantly impact your basil’s success. Size matters, my friend! A pot that’s too small will restrict root growth, leading to stunted plants. Too large, and you risk overwatering. Aim for a pot that’s at least 6-8 inches in diameter, allowing ample room for your basil to spread its roots. The material also plays a role; each type offers unique advantages and disadvantages.
| Pot Type | Pros | Cons | Best For |
|---|---|---|---|
| Clay (Terracotta) | Excellent drainage, breathable, helps regulate soil temperature. | Can dry out quickly, more prone to breakage, can leach minerals from the soil. | Experienced gardeners who can monitor watering needs. |
| Plastic | Lightweight, inexpensive, durable, retains moisture well. | Doesn’t breathe as well as clay, can overheat in direct sunlight. | Beginners, those who want a low-maintenance option. |
| Terracotta (glazed) | Many of the benefits of unglazed terracotta, but with improved water retention. | Can still dry out relatively quickly, more expensive than unglazed terracotta. | Gardeners looking for a balance between drainage and moisture retention. |
Soil Composition
Basil thrives in well-draining soil rich in organic matter. Soggy soil is a basil’s worst nightmare – it leads to root rot, a condition that will quickly send your plant to the great compost heap. A good potting mix should be light, airy, and retain just enough moisture to keep the roots happy.
Here’s a recipe for a custom basil-loving potting mix:
2 parts high-quality potting mix
1 part perlite or vermiculite
1 part compost
This blend provides excellent drainage, aeration, and nutrients. Perlite and vermiculite improve drainage and aeration, while compost adds essential organic matter.
Soil pH
Basil prefers a slightly acidic to neutral soil pH, ideally between 6.0 and 7.0. If your soil’s pH is too high (alkaline) or too low (acidic), it can affect nutrient uptake, leading to poor growth. Testing your soil’s pH is simple using a soil testing kit readily available at most garden centers. If adjustments are needed, you can amend the soil with pH-adjusting products, following the instructions on the product packaging.
For example, if your soil is too alkaline, you can add elemental sulfur; if it’s too acidic, you can add lime. Always follow package directions carefully.
Planting Basil Seeds or Seedlings: How To Plant Basil In Pots

So, you’ve got your pot and soil all sorted – fantastic! Now comes the fun part: actually planting your basil. Whether you’re starting from teeny-tiny seeds or already-sprouting seedlings, we’ve got you covered. Think of it like this: seeds are the budget option, a bit more hands-on, while seedlings are the “I want basil NOW” express lane.Choosing between seeds and seedlings is a bit like choosing between building a house from scratch or buying a pre-fab – both get you a house (or basil!), but the process is very different.
Planting basil in pots is a breeze! Simply fill your chosen pot – perhaps a charming terracotta one, or maybe a stylish number from big lots plant pots – with well-draining soil, plant your basil seedlings, and water regularly. Remember to give your basil plenty of sunshine for a bountiful harvest of fragrant leaves!
Starting Basil from Seeds
Let’s say you’re feeling adventurous and want to start from seeds. It’s a rewarding experience, like watching your little green babies grow up. But be warned, it requires a bit more patience than using seedlings. Here’s how to do it:
To ensure successful germination and growth, follow these steps carefully. Proper sowing depth and spacing are crucial for healthy basil plants.
- Sow the seeds: Gently press the seeds about ⅛ inch (3mm) deep into the soil. Don’t bury them too deep; they need sunlight to germinate. Imagine you’re tucking them into a cozy little bed.
- Space them out: Leave about 1 inch (2.5cm) between each seed. Overcrowding is a basil’s worst nightmare – it leads to competition for resources and weak plants. Think of it as giving each little basil its own personal space.
- Water gently: After sowing, lightly water the soil. Don’t drown the seeds! A gentle mist from a spray bottle works wonders. Think of it as giving them a refreshing shower, not a flood.
- Keep it warm: Basil loves warmth. Keep the pot in a warm spot (around 70-75°F or 21-24°C) with plenty of indirect sunlight. Think of it as a sunny vacation for your seeds.
- Maintain moisture: Keep the soil consistently moist, but not soggy. Check the soil regularly and water as needed. Think of it as Goldilocks and the Three Bears – not too wet, not too dry, just right!
Seeds vs. Seedlings: A Basil Face-Off
Now for the big showdown: seeds versus seedlings. Each has its pros and cons, a bit like choosing between pizza and tacos – both delicious, but different.
| Feature | Seeds | Seedlings |
|---|---|---|
| Cost | Generally cheaper | More expensive |
| Time to harvest | Longer (8-10 weeks or more) | Shorter (4-6 weeks) |
| Effort | More hands-on, requires more patience | Less hands-on, quicker results |
| Success rate | Can be lower if not done correctly | Generally higher success rate |
Transplanting Basil Seedlings
If you opted for seedlings (wise choice!), transplanting them into their individual pots is the next step. This is where you get to show off your green thumb prowess.
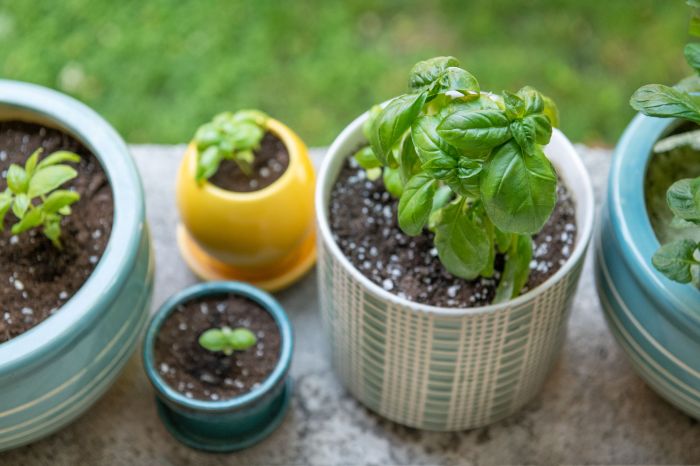
Imagine this: you gently lift a tiny basil plant from its crowded nursery, carefully handling its delicate roots, and placing it in its new, spacious home. The process involves carefully removing the seedling from its tray, gently loosening the roots without damaging them, and placing it in the new pot with fresh soil. Ensure the soil is moist but not waterlogged to prevent root rot.
Firm the soil around the base of the plant to support it.
Image Description 1: A close-up view of a hand carefully removing a basil seedling from a starter tray. The soil is gently loosened around the roots to prevent damage. The seedling’s roots are visible, appearing healthy and relatively undisturbed. The hand is gently supporting the base of the plant.
Image Description 2: A basil seedling is being placed into a larger pot filled with fresh, loose soil. The seedling is positioned slightly below the rim of the pot, allowing for growth. The soil is carefully firmed around the base of the plant, ensuring good contact between the roots and the soil, but avoiding compaction.
Image Description 3: The transplanted basil seedling is now firmly planted in its new pot, with the soil gently firmed around the base. The soil level is slightly below the rim of the pot, providing space for future watering and growth. The plant looks healthy and well-established in its new home. The overall image showcases the proper technique of transplanting, emphasizing gentle handling and appropriate soil compaction.
Harvesting and Storing Basil

So, your basil is thriving! It’s a leafy green jungle in your pot, and you’re ready to reap the rewards. But wait! There’s a right way and a wrong way to harvest this fragrant herb, and the way you store it can make or break the flavor. Let’s get harvesting, shall we? Think of it as a basil bounty hunt, but instead of gold, you’ll find deliciousness.
Optimal Harvesting Time for Maximum Flavor and Yield
The best time to harvest basil is when the plants are young and vigorous. Think of it like this: you wouldn’t wait for a tomato to become a giant, wrinkly beast before picking it, would you? Similarly, harvesting basil regularly encourages bushier growth and prevents it from flowering, which can make the leaves bitter. Aim to harvest leaves when they’re about 2-3 inches long, before they get too large and woody.
Regular harvesting, even just a few leaves at a time, is key to maintaining a plentiful supply. Imagine it as a never-ending basil buffet!
Basil Harvesting Methods: Pinching vs. Cutting
Now, for the exciting part – the actual harvesting! You have two main choices: pinching or cutting. Both have their pros and cons, like choosing between a comfy armchair and a thrilling rollercoaster.
| Method | Description | Pros | Cons |
|---|---|---|---|
| Pinching | Gently pinching off individual leaves or small stem tips with your fingers. | Encourages bushier growth; suitable for small harvests; easy and quick. | Can be time-consuming for large harvests; might damage the plant if done roughly. |
| Cutting | Using clean scissors or a knife to cut stems at a 45-degree angle, just above a leaf node. | Efficient for large harvests; cleaner cut reduces risk of disease; allows for larger portions to be harvested. | Requires tools; might be less suitable for very young plants. |
Basil Storage Methods: Fresh, Frozen, and Dried, How to plant basil in pots
Okay, you’ve harvested your basil bounty. Now, how do you keep it from wilting faster than a politician’s promise? We’ll explore three methods: fresh storage, freezing, and drying.
Fresh Storage: For the freshest flavor, store your basil like a delicate flower. Wrap it loosely in a damp paper towel, place it in a plastic bag, and refrigerate. It should last for about a week. Alternatively, you can put the stems in a glass of water, like a tiny basil bouquet, keeping it on the counter. This method is only for short-term storage, a few days at most.
Freezing: For longer storage, consider freezing. Blanch the leaves briefly in boiling water, then plunge them into ice water to stop the cooking process. Pat them dry and store them in freezer bags. This method will preserve the color and flavor fairly well. Imagine pulling out a bag of frozen basil six months later and adding it to your pasta sauce – the possibilities are endless (and delicious)!
Drying: Drying basil preserves it for an extended period. You can air dry it by hanging bunches upside down in a dark, dry place, or use a food dehydrator. Once completely dry, crumble the leaves and store them in an airtight container away from light and moisture. Dried basil is a great addition to soups, stews, and other dishes where the intense flavor is welcome.
Commonly Asked Questions
Can I use tap water to water my basil?
It’s best to use tap water that has been allowed to sit out for 24 hours to allow chlorine to dissipate. Chlorine can harm basil plants.
How often should I fertilize my basil?
Feed your basil every 2-3 weeks with a balanced liquid fertilizer diluted to half strength.
What should I do if my basil plant gets leggy?
Pinch back the top sets of leaves to encourage bushier growth. This also promotes more branching and leaf production.
My basil leaves are yellowing. What’s wrong?
Yellowing leaves can indicate overwatering, underwatering, or nutrient deficiencies. Check your watering schedule and consider fertilizing.
